共计 5676 个字符,预计需要花费 15 分钟才能阅读完成。
Warning: Undefined variable $img_type in /www/wwwroot/www.guoziweb.com/wp-content/plugins/wpjam-basic/cdn/remote.php on line 86
LAMP 架构,即 Linux Apache,Mysql,PHP, 在企业级产品中,应用的非常广泛,因为它的开源免费,配置灵活,安全性好而备受各大中小型企业的喜爱。但近年来,nginx 的出现,将慢慢打破被 apche 统治多年的 WEB 市场。nginx 是俄罗斯人开发的,官网上介绍说它是一个轻量级,高可配, 为了性能而生的新一代 WEB 服务器,特别是在静态页面的请求上资源消耗相当少。接下来我将以我们公司产品中遇到的实际情况做一个示例说明,因为讲这个概念和原理的人太多了,以下是我推荐的一些网址:
运维与架构:http://www.nginx.cn/
Apache 官网:http://www.apache.org/
nginx 官网:http://nginx.org/
PHP 官网:http://php.net/
在 Centos 中配置 LAMP 环境很容易,只需要执行以下几条命令即可。什么?你想用源码编译,那也可以,多多折腾总会有收获的。
yum install php mysql httpd -y安装完成后,在 httpd 的配置文件,默认路径为 /etc/http/conf/httpd.conf 加入以下模块和对应 index.php 即可。并将 Listen 端口改为 9000,后面配置反向代理有用。
LoadModule php5_module modules/libphp5.so
DirectoryIndex index.php
Listen 9000
至于更详细的配置这里不再多说,网上的教程多如牛毛 ,大家可以多多问度娘,谷歌。
那么 LANMP,大家应该已经想到了,就是 Linux+Apache+Nginx+Mysql+Php 了,那么问题来了 ![]() ,为什么要用到这种架构呢?
,为什么要用到这种架构呢?
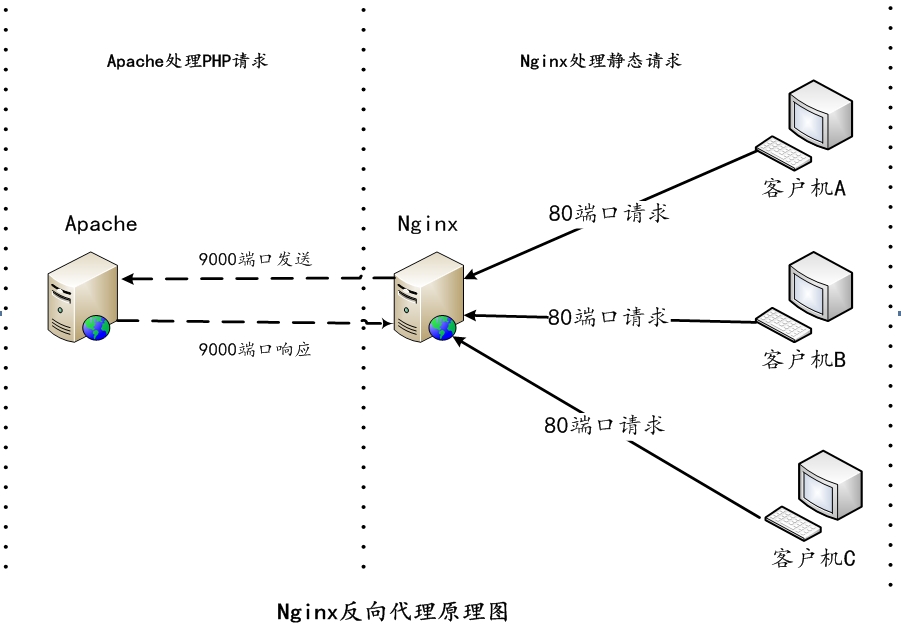
这种架构需求来源于我们公司的一个具体的性能需求,公司之前采用的是 LAMP 架构,当用户并发数一多时,各种 wget 请求和前台页面请求并发连接很多,很快就把 apache 的连接给占用完了,但这个时候内存还明显有很多剩余,这时我查看了下 apache 的配置,发现只配置了 MaxClientRequest 数为 200,也是因为考虑太大的话,全部是 php 业务请求时,内存会显得不足。其实这时面最大的一个问题就是一些静态页面的请求导致 apache 的连接被占用,并发上不去,那么这个时候我就想到了 LANMP 架构,利用 nginx 的反向代理功能,来处理连接的静态请求,至于 PHP 动态请求则交给 apache 的新连接端口去处理。我们以一个图来加深对反向代理原理的理解:

在我们这个模型中,代理服务器仅仅是把 PHP 需要处理的业务请求发送给了 apache 服务器,其它静态请求全部被代理服务器档了回去,其实说到这里大家应该都明白了,这就是一个负载均衡的实例了,不过我们的上游服务器只有一台,即应用服务器 C,如果有多台应用服务器,那么就是大型企业,如淘宝等应用的集群了,那么代理服务器将通过一系列的计算方法将请求均匀发送给应用服务器,“均匀”的方法有很多,比如 IP 地址散列,随机值等。
下面是具体的实施方法:
首先需要下载好几个包,分别是 pcre nginx-1.4.4.tar.gz 为了方便以后扩展,我们把 ssl 模块也编译了进去,至于编译方法和包的获取大家可以去参考我分享的 http://www.nginx.cn/:
./configure --prefix=/usr/local/nginx --sbin-path=/usr/sbin/nginx --conf-path=/etc/nginx/nginx.conf --error-log-path=/tmp/logs/nginx/error.log --http-log-path=/tmp/logs/nginx/access.log --pid-path=/var/run/nginx/nginx.pid --lock-path=/var/lock/nginx.lock --user=apache --group=apache --with-http_ssl_module --with-http_flv_module --with-http_stub_status_module --with-http_gzip_static_module --http-proxy-temp-path=/tmp/ --http-fastcgi-temp-path=/tmp --with-pcre=/usr/local/pcre接着执行 :
make
make install
到此 nginx 已经安装好了,这个时候我们缺少一个启动脚本,我们来写一个,名字为 nginx,内容如下:
#! /bin/sh
# chkconfig: 2345 55 25
# Description: Startup script for nginx webserver on Debian. Place in /etc/init.d and
# run 'update-rc.d -f nginx defaults', or use the appropriate command on your
# distro. For CentOS/Redhat run: 'chkconfig --add nginx'

### BEGIN INIT INFO
# Provides:          nginx
# Required-Start:    $all
# Required-Stop:     $all
# Default-Start:     2 3 4 5
# Default-Stop:      0 1 6
# Short-Description: starts the nginx web server
# Description:       starts nginx using start-stop-daemon
### END INIT INFO

# Author:   licess
# website:  http://lnmp.org

PATH=/usr/local/sbin:/usr/local/bin:/sbin:/bin:/usr/sbin:/usr/bin
NAME=nginx
NGINX_BIN=/usr/sbin/$NAME
CONFIGFILE=/etc/nginx/$NAME.conf
PIDFILE=/var/run/nginx/$NAME.pid
SCRIPTNAME=/etc/init.d/$NAME

case "$1" in
        start)
                echo -n "Starting $NAME..."

                if netstat -tnpl | grep -q nginx;then
                echo "$NAME (pid `pidof $NAME`) already running."
                exit 1
                fi

                $NGINX_BIN -c $CONFIGFILE

                if ["$?" != 0] ; then
                        echo "failed"
                        exit 1
                else
                        echo "done"
                fi
        ;;

        stop)
                echo -n "Stoping $NAME..."

                if ! netstat -tnpl | grep -q nginx; then
                        echo "$NAME is not running."
                        exit 1
                fi

                $NGINX_BIN -s stop

                if ["$?" != 0] ; then
                        echo "failed. Use force-quit"
                        exit 1
                else
                        echo "done"
                fi
        ;;

        status)
                if netstat -tnpl | grep -q nginx; then
                        PID=`pidof nginx`
                        echo "$NAME (pid $PID) is running..."
                else
                        echo "$NAME is stopped"
                        exit 0
                fi
        ;;

        force-quit)
                echo -n "Terminating $NAME..."

                if ! netstat -tnpl | grep -q nginx; then
                        echo "$NAME is not running."
                        exit 1
                fi

                kill `pidof $NAME`

                if ["$?" != 0] ; then
                        echo "failed"
                        exit 1
                else
                        echo "done"
                fi
        ;;

        restart)
                $SCRIPTNAME stop
                sleep 1
                $SCRIPTNAME start
        ;;

        reload)

                echo -n "Reload service $NAME..."

                if netstat -tnpl | grep -q nginx; then
                        $NGINX_BIN -s reload
                        echo "done"
                else
                        echo "$NAME is not running, can't reload."
                        exit 1
                fi
        ;;

        configtest)

                echo -n "Test $NAME configure files..."

                $NGINX_BIN -t
        ;;

        *)
                echo "Usage: $SCRIPTNAME {start|stop|force-quit|restart|reload|status|configtest}"
                exit 1
        ;;

esac
我们把它加入到系统启动脚本中去:
chkconfig --add nginx
chkconfig nginx on
我们修改下 nginx 的配置文件:/etc/nginx/nginx.conf,内容如下:
#nginx 的运行用户和组
user apache apache;
#这里填写与 CPU 个数一致
worker_processes  4;
#日志可自定义路径
#error_log  logs/error.log  notice;
#error_log  logs/error.log  info;
#pid 文件可自定义
#pid        logs/nginx.pid;

worker_rlimit_nofile 51200;

events {
# 使用 epoll 模型
    use epoll;
#最大支持连接数
    worker_connections  51200;
}


http {
    include  mime.types;
    default_type  application/octet-stream;
    server_names_hash_bucket_size 128;
    client_header_buffer_size 4k;
    large_client_header_buffers 4 4k;
#控制 nginx 上传文件时最大体积
    client_max_body_size 1024m;

    sendfile on;
    tcp_nopush on;
#关闭版本号
    server_tokens off;
    keepalive_timeout 10 10;
#开启图片压缩
    gzip  on;
    gzip_min_length  1000;
    gzip_proxied     expired no-cache no-store private auth;
    gzip_disable "MSIE [1-6].(?!.*SV1)";
    log_format  access  '$remote_addr - $remote_user [$time_local]"$request"''$status $body_bytes_sent "$http_referer" ''"$http_user_agent"$http_x_forwarded_for';

    server {
        listen 80;
        server_name localhost;
#WEB 根目录
        root /var/www/html;
        index index.html index.htm index.php;
        gzip off;
#字符集设置
        charset gbk;
#反向代理的配置,PHP 动态页面交给 apache 处理,其它静态文件在 nginx 中处理
        location ~ \.(php)?$ {
            proxy_set_header Host $host;
            proxy_set_header X-Real-IP $remote_addr;
            proxy_set_header X-Forwarded-For $proxy_add_x_forwarded_for;
#此处为 apache 监听的端口 9000
            proxy_pass http://127.0.0.1:9000;
        }
#开启图片缓存
        location ~ .*\.(gif|jpg|jpeg|png|bmp|swf)$
        {expires      30d;}

        location ~ .*\.(js|css)?$
        {expires      12h;}

        # proxy the PHP scripts to Apache listening on 127.0.0.1:80
        #
        #location ~ \.php$ {
        #    proxy_pass   http://127.0.0.1;
        #}

        # pass the PHP scripts to FastCGI server listening on 127.0.0.1:9000
        #
        #location ~ \.php$ {
        #    root           html;
        #    fastcgi_pass   127.0.0.1:9000;
        #    fastcgi_index  index.php;
        #    fastcgi_param  SCRIPT_FILENAME  /scripts$fastcgi_script_name;
        #    include        fastcgi_params;
        #}

        # deny access to .htaccess files, if Apache's document root
        # concurs with nginx's one
        #
        #location ~ /\.ht {
        #    deny  all;
        #}
    }
#配置虚拟主机目录,留着后用。include vhost/*.conf;
    #
    #server {
    #    listen       443;
    #    server_name  localhost;

    #    ssl                  on;
    #    ssl_certificate      cert.pem;
    #    ssl_certificate_key  cert.key;

    #    ssl_session_timeout  5m;

    #    ssl_protocols  SSLv2 SSLv3 TLSv1;
    #    ssl_ciphers  HIGH:!aNULL:!MD5;
    #    ssl_prefer_server_ciphers   on;

    #    location / {
    #        root   html;
    #        index  index.html index.htm;
    #    }
    #}

}
至此,我们就配置好了反向代理,并将动态与静态页面进行了分离,这样我们就很好的利用了 nignx 静态页面高并发能力的特点。apache 只要专心处理它的动态请求即可。
如果有其它不明白的地方,可以给我留言,或加我 QQ:411239339

呵呵,我是做服务端的,Linux下开发
果子搞嵌入式Linux啊
抢个沙发!